LIFE IS NEVER DULL repost


This is an old post that an avid follower found last week and inspired me to share it again.
It is written by George pre chalk paint.

I have been asked so many times...."Whats it like living with "? So I asked to write this post.
Well, I could write a book but instead I will donate a brief chapter.


Moi.....in deep thought

Her mind never stops. I can watch her thinking about a piece for hours/days - what to do with it, how
 to approach it, colour choices, embellishments, knobs, spray or hand paint. When all of the pieces of
 the puzzle fall into place (in her mind).....shes off like a shot and almost unstoppable until she
 completes the task. It is a really fun process to watch and I am always amazed with the results. I often
 wish I had that talent to vision artistic results.


Did you know she can paint other things as well?
She approaches every thing as though she is going to keep it. Numerous coats of primer and several
coats of finish paint. All of this after repairs and paint stripping. Talk about patience! And I dont have
 that kind of patience. I say to myself "just throw a coat of paint on it and sell it". But no....That is not
*Miss Do It Rights* mode of operation.


Weve been together for 3 and a half years now.....second time for both of us. We made a promise that
 life will be easy and fun. It has been that and more.


Ok....so I have a mushy side

I really enjoy meeting s customers and followers. And if I brag a bit....well......Im entitled and
 proud. Life with is an adventure in itself.


This is s daughter she is all dolled up here cause she was filming a movie when this was taken.
We are good friends and she thinks I am funny most of the time.
The 3 of us spend some really nice times together.


Heres Kat having a drink of water along side the always present paint brushes. She is the most
amazing animal I have ever met! She has been with for over 10yrs and has helped her thru
some very tough times. I had to stand up to Kats approval when we were dating.

Holly (s one and only sister) and Me again.

These 2 sisters are very different but each share their strengths with the other.

is a lot like her father - very mechanically inclined.
It is interesting to see them talk, share ideas, and work together on something.

I love the fact that can do what she is passionate about and be close by. We are never far apart
and sometimes she asks me for an opinion. I always give it honestly even if I dont agree with her. We
 all have different views on what we like or what looks nice to our eyes....dont we? (I have learned
very quickly that interior decorating is not my strong point)

We have a few different interests but we support and respect each others. I can build a house (been
there, done that) but do not have the patience or talent for redoing furniture. I like some sports but
especially hockey and she has little interest. But....she has come to learn and watch some hockey with me.

I hope I have offered an insight into life with , if anything "life is never dull with ".
George
Share:

INSTALLING DRAWER HANDLES without measuring


To start with I have filled the original holes on this drawer front and painted it.
 
For instructions on how to fill hardware holes follow this link:
http://blogspot.ca/2011/02/dont-limit-yourself-filling-tutorial.html
 
Here are the handles I chose.
 
 
Now the secret to your success is knowing where the holes were that you filled in.
No matter how great a job you do filling in, there is always the tiniest evidence you can see.
 
 
I use these points as my reference marks to position the new handle in a true position.
Standing directly over the drawer looking down helps a great deal.
 
 
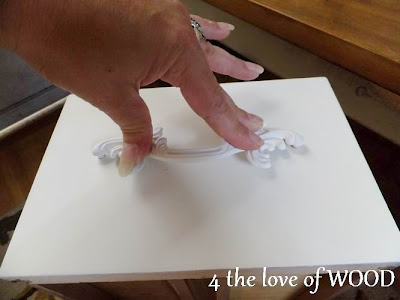
Take your time and once you have your spot picked,
put pressure on the handle and rock it back and forth.
 

This will leave small marks in the paint, reference points for you to drill.

 
Most handles have a small threaded collar that goes into the front of the drawer.
Make sure to check your drill size by comparing it to this threaded collar.


Drill one side slowly and brush away the sawdust before checking your fit.

 
Then double check your mark on the other side is in the right place.
Its like measuring twice and cutting once, plz double check!!

 
If for some reason you were off by an 1/8 of an inch it can become a problem.
It is fixable but if you check twice you wont have to email me for the solution.

 
Drill your second hole.


Now simply screw your handle in place.

 
Repeat each step for all your drawers.
 
Stop by firstfinds if you are in need of some shabby chic hardware to install in your drawers.
https://www.etsy.com/ca/shop/Firstfinds


Share:

FIXING DRAWER DAMAGE drawer stops


Many antique dressers have some damage to the drawers. This dresser was no different.
If there is too much weight in a drawer the bottom will push down and if your dresser has
metal drawer stops they will start to dig a groove into the wood.

 
The groove can get very deep, even go right through making a nice big hole in your drawer bottom.


To fix the problem move the metal drawer stop. You can pull it out with a pair of
pliers and use a hammer to re-install it. The bottom is a point that hammers into the wood.
 
 
If you dont have any drawers stops and you are looking replace them check out this article:
http://blogspot.ca/2011/03/stop-drawer-stop-tutorial.html
 
HAPPY FIXING


Share:

Humpty Dumpty!! Rebuilt Antique Buffet using Milk Paint!

I so love working on antiques.
I have been looking for a piece so that I could use the most amazing
color of milk paint! It's actually the most gorgeous shade of turquoise that
I have seen and it comes from the Real Milk Paint Co. More on the color later!
The pics really don't do it justice. I used it on an earlier dresser I did here. 
Anyway. I digress.  So I spotted this piece on CL listed as a dresser.
It's actually a little buffet. They were asking way too much for it because half of it was 
in pieces! The owner said the drawer fell down the stairs. 
uh, yeah.  This is my humpty-dumpty piece. Read on! 

 Quite the mess, eh??! The right door was snapped off at the piece that attaches to the hinge.
Luckily the owner had all the pieces and I was able to sand, glue and clamp. You cant even tell
it was ever broken. Thankyouverymuch. 
The pic below is the middle drawer. All ten pieces of it.  Yikes! 

And here is Humpty all back together! 
 The mirror was in pretty poor shape. I used a stencil and some frosted glass spray to try and 
camouflage the defects. 

Read more »
Share:

Chateau les Chats fin


Hi Everyone,

Well we finally finished the cat castle. What a project this was. I didnt think it would be very strong or hold up well initially but you know what-this thing is built like a castle! Its very heavy and very stable so large maniac cats jumping on it cant knock it over. Here are some photos:

This is the completed framework. As you can see its made out of construction-grade lumber. Its over 4 feet high and the base is 2 ft square:


Here it is completed. I couldnt find any small, reasonably priced carpet remanents anywhere so we didnt use plush carpeting. Instead I found a small piece of office-type carpeting and by not covering all the posts we made it work with small scraps to spare. The posts that didnt get completely covered became cat scratching posts by winding 3/8" sisal rope around them. That part really hurt my hands. But with my youngest son and husband helping we got it all done:


This is a heavy piece of furniture that should last a very long time and looks good in the living room. I hope those two little maniacs enjoy it.

More later,

LaV.
Share:

Graffiti Stenciling An Art Of Ideas

People have different choices of expressing themselves. Some people sit at a corner and cry their heart out if they are depressed. Other people become silent when they are in a depressed state. When people are happy, they tend to be overjoyed and tell the world of their happiness. People have different personalities that they have their own choice of expressing themselves. Doing an art work is one choice of expressing feelings like depression and happiness. Stenciling is a form of art where people can express themselves by doing their own designs.

Stenciling traces backs it roots to the era of the caveman where no technology was present. The cavemen must have used the natural resources afforded to him by mother earth. Hand stencils and evidences of leaves stencils were discovered in certain areas and dated back to this period. More than just doodling on the caves and leaves, the early stencil patterns are patterns that helped archaeologists and historians in determining important facts about the life in the Prehistoric Era.

Stenciling has proliferated in many different countries and has taken different forms. One form of stenciling is stenciling graffiti. When people hear the word graffiti, their common notion is that it is vandalism and it is against the law. Nonetheless, stencil graffiti has established its name as an art and has a big following.

This kind of stenciling utilizes paper, cardboard and other things to produce a picture or words that are reproduced easily. After drawing a design in the medium, the design is cut out and moved to a facade by using spray paint or roll on paint. Here are few things to consider when you are thinking of doing a graffiti stencil.

1.) Think of your purpose and motivation in doing the stencil graffiti. Understand your motivation so that you will have more expression and more emotion in your graffiti.

2.) Select a method to make stencil designs.

3.) Think of an image that will best represent your thoughts.

Stencil graffiti artists are people who represent their thoughts, emotions and principles. Oftentimes, people who use stencils in doing graffiti comes form the various social institutions. These institutions include the education, church and even the government. Activists and radicals use this form of stenciling to convey their ideas and protests. With the use of graffiti, people might be attracted to join in their advocacies and campaigns.

Stenciling graffiti have become a sub culture in most parts of the world. It is highly recognized as a form of art. Nonetheless, there are still countries which prohibit this stenciling art because they consider it as vandalism.

Stenciling art is not merely an art that expresses messages, ideologies and principles but it is more of calling the attention of others to the issues of their country. Graffiti are seen in streets and walls in different countries. Some government prohibits this art because of the messages that are written in the walls.

Stenciling graffiti is a very powerful medium where activists and nationalists alike can voice out their opinions. It is a good choice to call the attention of the government or some organization. Most of stenciled graffiti talk about change. Most graffiti artists are also against the government and wants reform.

Nonetheless, it is safe to say that stenciling graffiti is not merely an art but rather a catalyst for change.
Share:

How to Build a Campaign Style Desk


On Mondays post I shared a few photos and why this desk wasnt a weekend project and how it could be. Today Ill talk about how we built it. Again, a big thank you to David for doing most of it, I was more of an assistant on this project!

First, we calculated the amount of wood we needed and off we went to Home Depot to pick up our supplies:

1x12 Poplar (about 10)
1x2 Poplar (about 48 - we made a second trip for more wood, so I think this is about right :)

For those not familiar with American terminology for wood, for some reason a 1x12 isnt actually 1" tall x 12" wide it is really 3/4" tall x 11 1/4" wide. Same applies for other sizes too, like a 1x2 is really 3/4" x 1 1/2". I know, weird. Just wanted to go over that upfront since I talk about measurements below :) 

Anyways, total for the wood was around $100

We also needed: 

Brass Screws

Wood Glue

Then the two 1x12s were cut and glued together and held with a clamp. Once dry, 5 supports were cut out of 1x2 poplar, the same width as the top and attached to the bottom of the desk with glue and screws and clamped to dry (The last support should be snug against the leg so make sure to account for that- see photos towards end of post). Then 1x2s were cut at a 45 to make the outer frame, glued and  then clamped in place to dry. If you have any gaps use a small amount of wood filler to fill them. 


After everything had dried, all the edges and where the wood meets was sanded with the orbital sander  (120 and then 220 grit) 


Next, we calculated the angle of the X legs. On the table, we started at the edge of the 1x12 (not the very end at the trim) and measured 29.25" for a 30" standard desk height accounting for the .75 top too. We laid two 1x2s on top of each other in an x on the desk top. Lining the top board with the outside of the trim and the bottom with the inside of the trim. We marked with a pencil where the boards intersect in the middle and a straight line at the top and bottom. 

Next we cut the angles (which were just marked) for the top and bottom for eight boards (4 for each x-leg).  We then cut the center sections (drawn where the legs cross making the X) on four of the boards. 

If you use a wood like poplar with a lot of variety in color and grain, you will want to spend some time to match similar boards for each leg. 

Last, we cut a 1.5 inch section out of the inner rear leg to later attach the center brace. 

Now to assemble the legs!  We applied wood glue to all of the pieces, clamped them together and screwed them from the inside. We assembled the four pieces as shown below and then sanded them to make sure the connections were seamless. 


After sanding, we applied glue and screwed the individual legs together creating the X. 


Once the X sides were complete, we applied glue to the corners and sides and set them in place. 


For extra support, we added wood angles to lock the legs in place. David cut a few angles to find the perfect fit and then cut the angle so it would sit flush with the trim. it was glued and clamped in place.


After the legs were set, the center brace (going between the X sides) was glued into place. The center brace was constructed of two 1x2s cut to the width of the table minus three inches (for the trim and outer board of the x-leg)

And that was it! You can see that we used a combination of wood glue and hidden (or less noticeable screws) for the construction. As long as the wood glue dries thoroughly and is clamped to dry, it is very strong! For areas that have more stress, like the legs and table top center supports, we also used screws in addition to the wood glue. Ill take more photos once we have the office complete, but since I took the photos, I also have my large Mac desktop on top and it is very solid. 


I love the grain of the poplar! It probably isnt for everyone, in fact as I was looking at hardwoods online, I saw some references to it as the ugly hardwood. The nerve! Im thinking they were referencing the extreme difference in grains ... so it does take more time to pick out ones that are similar.  

The desktop looks like one piece of wood because we chose wood where the grain would match, also sanding it until it was smooth helped even out the line. 


I think the legs look pretty seamless too ...


If we were building this again, I probably would use oak due to it taking less time in sanding, see Mondays post for my full explanation of why wasnt a weekend project and how to turn it into one!

The total cost was around $100 for wood and about $10 more for screws and wood glue if not already owned. So about $100 cheaper than the World Market equivalent  

Im off to get supplies and work on my next project ... follow me on instagram @sarahmdorseydesigns for sneak peaks! 
 
Share:

Popular Posts

Cari Blog Ini

Powered by Blogger.

Label

Recent Posts

Pages