


To start with I have filled the original holes on this drawer front and painted it.
For instructions on how to fill hardware holes follow this link:
http://blogspot.ca/2011/02/dont-limit-yourself-filling-tutorial.html
Here are the handles I chose.

Now the secret to your success is knowing where the holes were that you filled in.
No matter how great a job you do filling in, there is always the tiniest evidence you can see.

I use these points as my reference marks to position the new handle in a true position.
Standing directly over the drawer looking down helps a great deal.
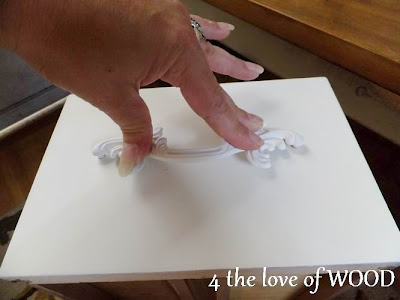
Take your time and once you have your spot picked,
put pressure on the handle and rock it back and forth.

This will leave small marks in the paint, reference points for you to drill.

Most handles have a small threaded collar that goes into the front of the drawer.
Make sure to check your drill size by comparing it to this threaded collar.


Drill one side slowly and brush away the sawdust before checking your fit.

Then double check your mark on the other side is in the right place.
Its like measuring twice and cutting once, plz double check!!

If for some reason you were off by an 1/8 of an inch it can become a problem.
It is fixable but if you check twice you wont have to email me for the solution.

Drill your second hole.


Now simply screw your handle in place.

Repeat each step for all your drawers.
Stop by firstfinds if you are in need of some shabby chic hardware to install in your drawers.
https://www.etsy.com/ca/shop/Firstfinds


No comments:
Post a Comment
Note: Only a member of this blog may post a comment.